Introduction
“Wait… where did all my iPhone photos just go?”
Let’s be honest: Files can disappear from your phone in an instant. A mistyped command, or a buggy update, could send you into an absolute panic.
So, when it goes this way, good-quality iPhone recovery software is one of the ways to do it. But the thing is, picking up the right one is important. What you are looking for is a product that is safe, user-friendly, and indeed, supports the type of file that you lost.
This article explains how to choose safe and reliable iPhone data recovery software after accidentally losing your data.
Part 1. What iPhone Data Recovery Software Can Do
iPhone data recovery software can recover supported data types from an accessible device or backup.
- Search for lost items: The device or the backup of your iPhone can be searched for the deleted data.
- Restore all types of media: Recover images, videos, text, address book and much more.
- Help recover lost data after several issues: The tool can rescue the lost data because of accidental deletion, unsuccessful updates, system malfunctions, etc.
- Review files: It allows you to see the list of the items that can be restored before recovering them from the files that you scan.
- Support backups: Certain tools allow data recovery from iCloud or iTunes backups.
Part 2. Features to Check Before Choosing Recovery Software
Some recovery tools may seem alike but differ internally. Before choosing a recovery tool, check its supported sources, data types, compatibility, trial limits, and export options.
- Recovery options: Get iPhone storage, iCloud, and iTunes backup support.
- File types: Be certain of only those data types it can recover that you lost.
- Preview feature: Preview the results to check whether the missing items are present before paying for a supported recovery option.
- Check subscriptions: Select the right tool as per your budget.
- iOS compatibility: Make sure it works with your iPhone model and iOS version.
- Easy interface: A streamlined method makes it simple to go through the process without much help.
- Security: Your confidential information should be completely kept safe throughout the scanning and recovering phases.
Part 3. What Types of iPhone Data May Be Recoverable
There’s a variety of files you can get back depending on the reason for their loss, such as
- Where the files were kept
- The range of files the recovery tool can retrieve.
Usually, some files can easily be recovered even if others cannot.
People usually try to recover photos and videos as they are the common data types that are lost. Apart from that, recovery apps can find messages, contact lists and call history that have been wiped out mistakenly.
The scan may even detect notes, alarms, calendar events and Safari data if the recovery method allows it.
You could also get back app data like WhatsApp messages or their attachments if it is a feature of the software being used for recovery. While certain recovery tools can scan supported data from an accessible iPhone directly without the need to use iCloud or iTunes backups, others rely on those backups.
Therefore, prior to purchasing a recovery tool, make sure about which data types and recovery sources it can handle.
Part 4. How to Scan, Preview, and Recover Selected Data with Dr.Fone
Dr.Fone – Data Recovery (iOS) enables a much more flexible recovery as it allows you to scan your iPhone or available backups, preview recoverable files, and select only those that you need. It offers the option of recovering your iPhone directly as well as recovering your data from iCloud backups, iCloud-synced, and iTunes or local backups.
Key features
- Free scan and preview: Check available files before paying for recovery with Standard Mode. Activation is required to recover and export data.
- Multiple recovery sources: Recover data from your iPhone, iCloud, iTunes, or local backups.
- 35+ data types: Supports photos, videos, messages, contacts, notes, app data, and more. Data types and recovery options depends on source, mode, device, and iOS version.
- Selective recovery: Recover only the files you actually need.
- Read-only scanning: Scans the device without overwriting existing data.
- Export to computer: Save selected recovered files directly to your computer.
- No backup required: Scan a supported iPhone directly when no backup is available.
How to Recover Data from an iOS Device with Dr.Fone
Step 1: Connect Your iPhone and Open Recovery Mode
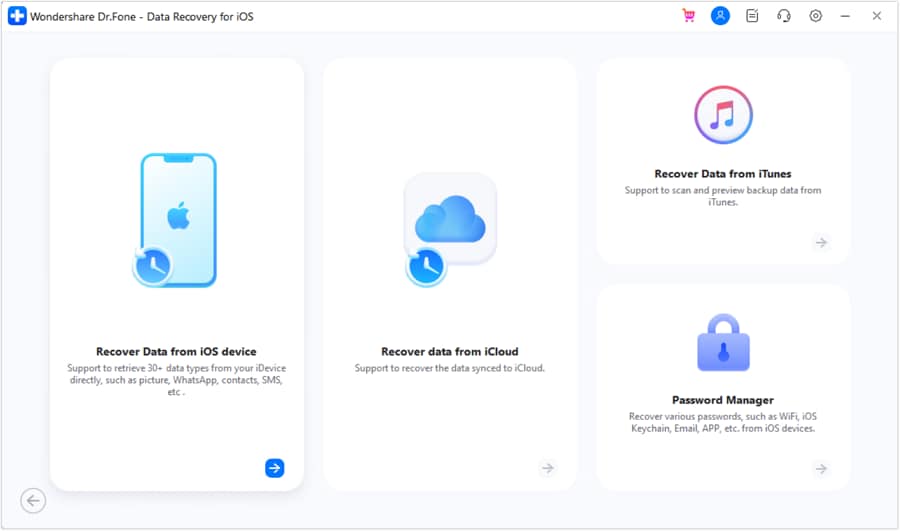
First, launch Dr.fone app on your computer. Go to Toolbox and then to Data Recovery. From there, select iOS and click on “Recover Data from iOS Device”.
Step 2: Select Recovery Mode and Select Type of Files
After your device has been successfully recognized by Dr.Fone, you may proceed to Standard Recovery or Advanced Recovery mode to perform a scan of your iPhone’s data. Pick the kinds of files that you lost and hit Start Scan.
Advanced Recovery Compatibility: Advanced Recovery supports iPhone 16 series and earlier models running iOS 17.0–18.7.1 or iOS 26.0–26.0.1.

Step 3: Look through Your Data while Scanning
Still keep the USB connection with your iPhone while the software checks your device.
Step 4: Get Back the Files you Lost
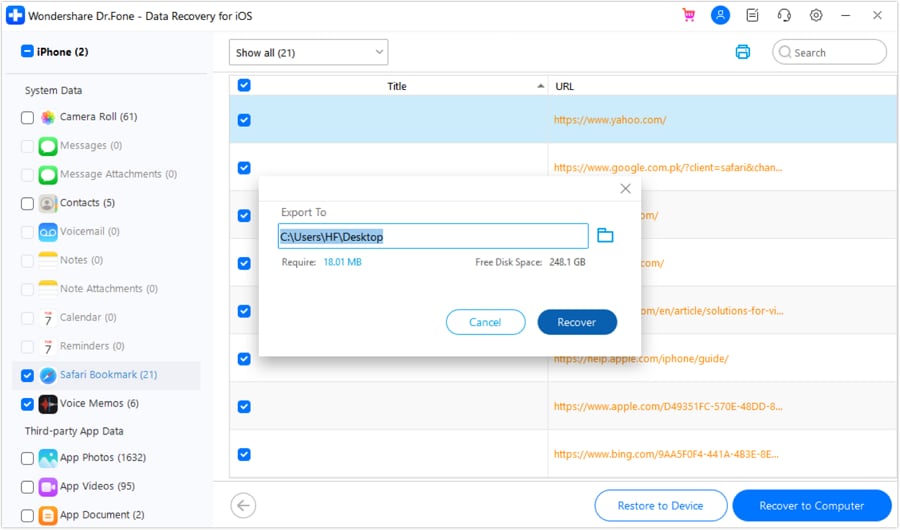
After that, select the files that you really need. To restore your iPhone’s data, tap “Restore device” and then “Restore to device”. Otherwise, you can just “Recover the files” and save the selected files locally on your computer.
Part 5. Tips That May Improve the Chance of Recovery
Time is important when it comes to data loss. If you quickly take some simple steps afterwards, you can save a lot of files by preventing the deleted files from being overwritten and increase your chance of being able to find your files again with recovery software.
- Stop using the iPhone: Do not take new pictures, record videos, or download new apps after losing your data.
- Don’t reset the device: A reset to factory settings can complicate the process of data recovery.
- Check your backups: If you are going to attempt some sort of major recovery, make sure you first look at your iCloud or iTunes backups to see if your files may be there.
- Select the proper recovery source: If the data was not retrieved from the device, try to locate the right supported iCloud or iTunes backup.
Closing Words
Losing valuable iPhone data can be quite a worrying experience. If you are looking for iPhone data recovery solutions, it is essential to get the right iOS/iPhone recovery software.
Dr.Fone – Data Recovery (iOS) brings together the necessary features like recovering lost data from different sources like your iPhone, iCloud, backups from iTunes or a computer. Besides, their scan-and-preview technique enables you to figure out the file you want to recover without actually recovering them all.