Have you ever snapped a series of photos and thought, “This would make a great video?” Whether capturing a stunning time-lapse, creating an animated sequence, or compiling cherished memories into a slideshow, turning image sequences into videos can bring your visuals to life.
But where do you start? Luckily, plenty of software tools are designed to make this process easy and fun.
This article will explore the top 10 software options for transforming image sequences into videos.
Tool 1: Filmora Image Sequence
Wondershare Filmora is a renowned video editor that helps you make awesome videos, even if you’re just starting. It’s like having a magic tool that turns your pictures into movies.
Filmora is easy to use and has many fun features, like adding music, effects, and transitions. Whether you make a simple video or a big project,Filmora image sequence can help you do it.
Standout Features:
Whether you’re a professional editor or a hobbyist, Filmora’s features are designed to enhance your creative workflow, convert image sequences to video, and produce high-quality results.
Seamless Import of Image Sequences
Filmora allows you to import extensive and lengthy sequences of JPG images effortlessly without any lag or loss of quality. This feature perfectly creates and saves visual effects in formats like MP4, MOV, or GIF. You can export your projects to your computer or publish them directly to YouTube, Instagram, TikTok, or Facebook in just a few minutes.
Export Videos as Image Sequences
You can turn a sequence of images into a video, and Filmora also supports exporting videos as JPG or PNG image sequences. This allows you to use your video content differently for detailed editing or creating stunning visual effects.
No Compatibility Issues
Filmora is compatible with all video and audio formats, allowing you to upload your JPEGs and combine them without worrying about compatibility issues. It supports various resolutions, frame rates, and qualities, ensuring maximum project flexibility.
Cloud Integration for Easy Access
Forget about lengthy file transfers! Filmora offers multiple cloud integrations, enabling you to import images directly from Google Photos, Google Drive, Dropbox, or OneDrive in seconds. There’s no need to transfer files to your computer beforehand, making your workflow smoother and more efficient.
Step-by-Step Guide to Conversion
Follow this guide to convert image sequence to video.
1. Open Filmora: With the Create Project tab selected on the left side, click the New Project button.
2. Import Images or Image Sequences: Add as many images as you want for your video in the Import section. Filmora supports image sequences, allowing you to add large JPEG sequences and seamlessly turn them into videos.
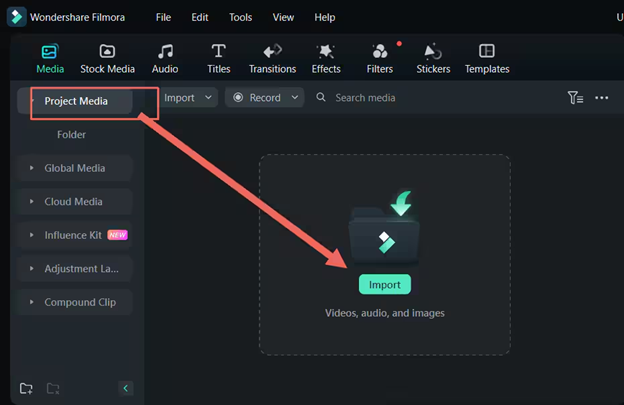
Image Name: converting-image-sequences-to-videos-1.jpg
Image Alt: Import
3. Add Image Files to the Timeline: Drag and drop the images from the Import section into the Timeline at the bottom of the screen.
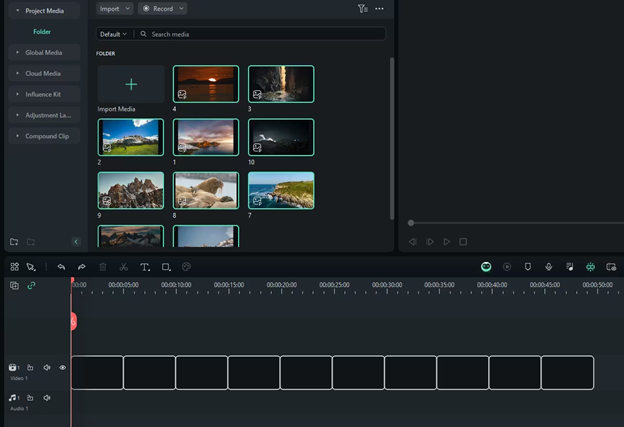
Image Name: converting-image-sequences-to-videos-2.jpg
Image Alt: add images
4. Adjust the Duration in the Timeline: Select an image in the Timeline and drag its border to adjust the length of time each image appears in the video.
5. Add Various Video Effects: Explore the Audio, Transitions, Effects, Filters, and Stickers tabs to add different elements to your video.
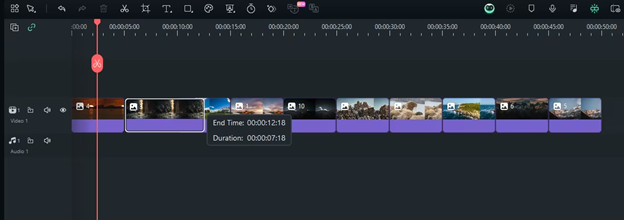
Image Name: converting-image-sequences-to-videos-3.jpg
Image Alt: effects
6. Create Animations for Your Video: Go to the Editing panel on the right side. Add animations to your video to make it more dynamic.
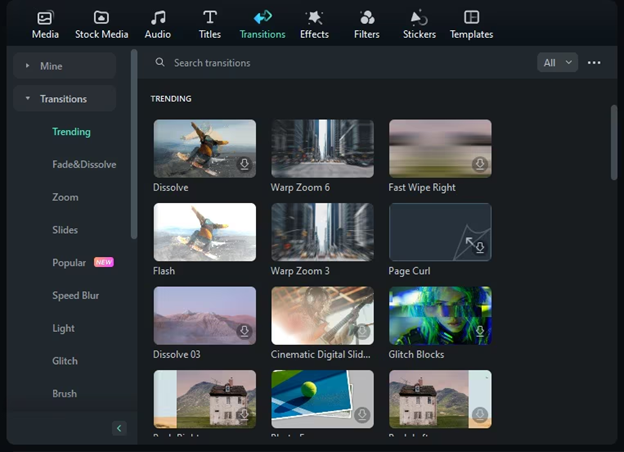
Image Name: image-sequence-to-video-conversion-4.jpg
Image Alt: add animation
7. Finalize and Export Your Video: Once satisfied with your video, proceed to export it. Filmora allows you to create a video with pictures and music in minutes and make powerful edits that tell a fantastic story.
Filmora image sequence gives you complete creative freedom to customize videos.
Tool 2: Flixier
Flixier is an online video editor that lets you create videos without installing software. It’s fast, collaborative, and works directly from your web browser, making it convenient for quick projects or those who prefer not to download programs.
Standout Features:
- Cloud-Based Editing: Make image sequences to videos quickly and edit without taxing your computer’s resources.
- Extensive Format Support: Upload various image formats, including JPEG, PNG, and GIF.
- Built-In Stock Libraries: Access to free stock images, videos, and music.
How to Use It
Step 1: Create a Flixier Account and Upload Your Media
First, sign up for a free Flixier account.
Click on “Create Project.”
Look at the Library tab on the left side to upload your videos and pictures. You can drag and drop files from your computer into this area or click the “Import” button to import files from Google Photos, Google Drive, OneDrive, Dropbox, Twitch, or YouTube.
Step 2: Assemble Your Pictures and Videos
To add media to your montage, drag them from the library to the Timeline at the bottom. The Timeline shows when things appear in your video, moving from left to right.
The Canvas area lets you preview your video. You can move items around on the canvas to change how they look on screen.
Adding Transitions
To add transitions between clips or images, drag one over another on the Timeline so they overlap. Then, choose a transition from the drop-down menu that appears.
If the clips are on different tracks, go to the Transition tab on the left. Select a transition and drag it onto the Timeline where you want it. Adjust the timing by dragging the edges of the transition.
Adding Music
To add background music, drag your music file into the library. Then, add it to the Timeline just like any other media.
If you don’t have your music, click on the Audio tab. Browse through the free tracks available and choose one you like.
On the right side of the screen, you can make the music fade in and out or change its volume. You can also apply an equalizer to enhance the sound.
Adding Text
Need to add text? Go to the Text tab on the left. Drag an animated text template onto the canvas.
You can edit the text, choose a font, and pick colors to match your video’s mood.
Step 3: Export or Share Your Video Montage
When you finish editing, click the blue “Export” button in the top right corner.
A menu will appear. You can name and publish your video directly to YouTube, Facebook, or other platforms.
Rendering turns your montage into a video file. With Flixier, this process takes about 3 minutes or less because it uses powerful servers instead of your computer.
After rendering, you can download your video or share it online.
Tool 3: Typito
Typito is an online video editor emphasizing ease of use and professional-looking typography. It’s ideal for creating videos with compelling text overlays, making it an excellent choice for marketing materials and social media content.
Standout Features:
- Drag-and-Drop Interface: Simple tools make it easy to create videos from image sequences.
- Branding Options: Customize videos with your brand’s colors, logos, and fonts.
- Supports High-Resolution Exports: Export converted videos in up to 1080p resolution.
How to Use It
Step 1: Upload Your Photos
Start by uploading all the images you want to include in your video.
Step 2: Create a Video from Your Photos
Arrange your photos to create the perfect sequence. Use editing tools to crop, trim, or resize the images to enhance your video. Add background music and text captions to give your photo slideshow a creative and personal touch.
Step 3: Download Your Video
Preview your video to ensure everything looks just right. When you’re happy with the result, click the export button at the top right corner of the editor.
Tool 4: Clideo
Clideo is an online platform offering video tools, including a slideshow maker that converts image sequences into videos. It’s perfect for quick projects and doesn’t require any software installation.
Standout Features:
- Secure Processing: Files are protected and deleted after processing.
- Supports Various Formats: Works with multiple image and audio formats.
- Customization Options: Adjust image duration aspect ratio and add music.
How to Use It
Step 1: Upload Your Images
Start by selecting one or more image files from your device and import them into the video editor.
Step 2: Convert Your Image Sequence into a Video
If you’d like to add more images, simply drag them into the editor or copy and paste them. Go to the “Canvas” tab to set your project’s aspect ratio. To add background music, click on the “Music” tab in the navigation sidebar and import your audio file. Adjust the music settings as needed. When satisfied with your setup, click “Export” to create your video.
Step 3: Download Your Video
After exporting, play your newly created video to ensure it looks how you want it to. Click “Edit” to adjust your video if you need to change.
Tool 5: VEED
VEED is an online video editor known for its simplicity and speed. It allows you to create videos from images effortlessly, making it suitable for both personal and professional use.
- Real-Time Previews: See changes as you make them.
- Filters and Effects: Enhance your video with various visual effects.
- Text and Subtitles: Easily add text overlays and subtitles.
How to Use It
Step 1: Upload Your Images
Begin by uploading your images to VEED.
Step 2: Add Music, Text, and More
Transform your images into a video by adding music, text, subtitles, transitions, and other effects. Explore VEED’s wide selection of video editing tools to enhance your creation.
Step 3: Export and Share
When you’re happy with your video, click on “Export.” Download your finished video and share it on social media or any other platforms you prefer!
Tool 6: Animoto
Animoto is a popular tool for creating professional videos from photos. It’s known for its easy drag-and-drop interface and wide range of customizable templates.
Standout Features:
- Variety of Templates: Offers templates for different occasions and purposes, making creating videos that suit your needs simple.
- Music Library: Includes a vast collection of licensed music to enhance your videos.
- Text Overlays: You can add text to provide additional information or context.
- High-Quality Exports: This enables you to export high-quality videos, ensuring they look professional.
How to Use It
Step 1: Choose a Template or Start from Scratch
You can begin by selecting a video template that fits your project, or you can start with a blank canvas if you want complete creative control.
Step 2: Upload Your Media
Add your pictures and video clips to the project.
Step 3: Personalize Your Video
You can make the video uniquely yours by adding custom text, selecting colors, and uploading your logo.
Step 4: Produce and Share
Once you’re happy with your creation, produce the final video and share
Tool 7: Pictory
Pictory uses AI to transform image sequences into videos with animations and transitions. It’s designed for creating marketing videos and social media content and offers plenty of customization options.
Standout Features:
- Customizable Animations: Provides a range of animation options to make your videos more engaging.
- Music Integration: This lets you add music from Pictory’s library or upload your tracks.
- Voiceover Options: Allows you to record and add voiceovers to your videos.
- Automated Editing: Uses AI to edit and enhance your videos automatically.
How to Use It
Step 1: Choose a Template
Start by browsing Pictory’s library and select a template that fits your project.
Step 2: Personalize Your Video
You can customize the template with your own content, add your branding, and adjust style preferences to make it uniquely yours.
Step 3: Review Your Creation
Preview your customized video to ensure it looks the way you want.
Step 4: Share and Download
Download your finished video and share it on social media.
Tool 8: Lumen5
Lumen5 converts image sequences to videos, which is ideal for content marketing and social media posts. It uses AI to simplify the video creation process.
Standout Features:
- AI Storyboarding: Helps you create a storyboard for your video based on your content.
- Media Library: Offers a vast collection of stock images, videos, and music.
- Branding Options: This lets you customize videos with your branding elements.
How to Use It
Step 1: Upload Your Video
Start by selecting the video you want to add an image to. Then, upload it from your device.
Step 2: Upload or Find an Image
Choose the image you want to place over your video.
Step 3: Download and Share Your Video
Play back the video to ensure the image is exactly where you want it. If everything looks good, click “Create” to produce your new video with the added image. After it’s processed, you can download and share the video on any social media platform you choose.
Tool 9: Magisto
Magisto is an AI-driven video editing tool that creates polished videos from images and clips. It’s known for its ease of use and automated features.
Standout Features:
- Automatic Editing: Uses AI to edit your videos quickly and easily.
- Music Selection: Provides a library of music tracks to add to your videos.
- Theme Options: You can choose from various themes to give your video a specific look.
- Social Sharing: This makes sharing your videos on social media platforms easy.
How to Use It
Once logged in, click on the ‘Create’ button to start a new video project.
Step 2: Upload Images
You can drag and drop your image sequence files into the designated area or browse your computer to select the images.
Step 3: Choose a Style
Magisto offers various editing styles, including transitions, effects, and themes. Choose one that best suits the mood or purpose of your video.
Step 4: Add Music
You can select music from Magisto’s library or upload your own. If necessary, adjust the music length and volume to match the length and mood of your video.
Step 5: Create and Edit the Video
Use Magisto’s online tools to trim clips, adjust the duration each image is displayed, and add any additional text or effects. Always preview your video to ensure everything looks and sounds right. Make any necessary adjustments.
Step 6: Produce and Share
Once satisfied with your creation, click on the ‘Produce’ button to render your video and share it.
Tool 10: InVideo
InVideo offers comprehensive tools for creating videos from images, including templates, effects, and transitions.
Standout Features:
- Pre-Built Templates: Provides a wide range of templates for different types of videos.
- Voiceover Recording: This lets you record and add voiceovers to your videos.
How to Use It
Step 1: Choose a Template
Start by selecting a template from the vast library of pre-made options.
Step 2: Upload Your Pictures
Simply add the images you want to include in your project.
Step 3: Add Text and Music
Enhance your video by adding text overlays and background music.
Step 4: Use Transitions, Effects, and Stickers
To make your video more dynamic and visually appealing, apply transitions between your photos, add visual effects, and include stickers.
Step 5: Export
Once you’re happy with your creation, export your video.
Conclusion
Transforming a sequence of images into a captivating video doesn’t have to be daunting. With the right tools, you can create professional-looking videos that tell a story, showcase your work, or preserve precious memories.
From user-friendly options like Wondershare Filmora to AI-powered platforms like Pictory and Magisto, there’s a tool tailored to fit your needs and skill level. So go ahead, pick a tool that suits you best, and start bringing your images to life through video magic.